The AimBetter Agent should be installed in at least one Windows server in your company’s domain. The server in which the AimBetter Agent is installed will be denominated the Agent Server. This server doesn’t need to be exclusively dedicated to AimBetter.
For information about the installation of the AimBetter Agent, click here.
After installing the AimBetter Agent, you must configure the server to be monitored on the AimBetter Configurator.
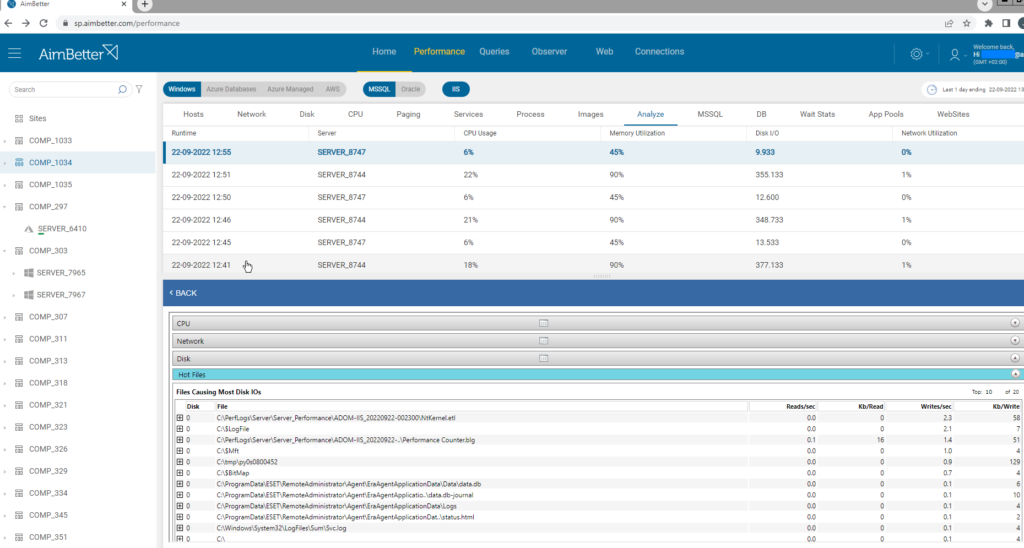
Monitored Server Configuration
Follow the configuration steps according to your server platform.

On the AimBetter Configurator, click Add on the Hosts tab and choose Windows from the available platforms.
Fill in the Server details:
-
-
- Name: General display name (what will be displayed in the UI)
- IP/Name: Server name or IP – For Local installation, you should insert a dot ( . ) in this field.
-
Notice for remote monitoring: Add the correct server name or IP and make sure that the user running the AimBetter Agent is a domain user with the necessary credentials – Administrator or Minimal Permission User.

1- Create a Linux User for the AimBetter Agent:
-
- Enter the Linux terminal with a user that has admin-level access and run the following script.: sudo useradd -m aimbetter
- This user doesn’t need any special permissions.
- Check that the user was created with the chosen username through this script: ls -la /home/aimbetter/
- After creating the aimbetter user, select a password for the user by entering the next command: sudo passwd aimbetter
- Following this command, an empty box will be displayed with an option to insert the password. Insert your password and press enter. If the password is not accepted according to the requirements, you will receive an error message and be requested to enter a new password. If the password is accepted, you should receive a confirmation message.
- Note: The created Linux user must run any commands from his Login shell. To check if you are using the Login shell, run the following command: ” $ echo $0 ” . If the result is “-bash” or “-su”, you are on the Login shell. Be sure that it has a hyphen (-) as a prefix.
2- On the AimBetter Configurator, click Add on the Hosts tab and choose Linux from the available platforms and fill in the Linux server details:
-
- Name – display name (UI)
- IP/Name – the correct server name or IP
- User name – the created Linux user
- Password– the correct password for the created Linux user

1- Create an IAM Login for the AimBetter Agent with read permissions only on the RDS portal:
-
- Enter the AWS Management Console with a user that has management privileges
- Go to IAM and select Users
- Click on Users -> Add user
- In Set user details, fill in the field User Name* (choose the user name – for ex: AimBetterUser)
- In Select AWS access type, select: Access type* -> Programmatic access
- Filter and select policies: AmazonDocDBReadOnlyAccess and CloudWatchReadOnlyAccess
- Click on Next and finish the Create user steps
- Make sure to copy and save the access key and security key
- For more details, check Creating an IAM Login.
2- On the AimBetter Configurator, click Add and choose AWS RDS from the available platforms and fill in the details:
You can get these details from the database panel, as shown in the image below.
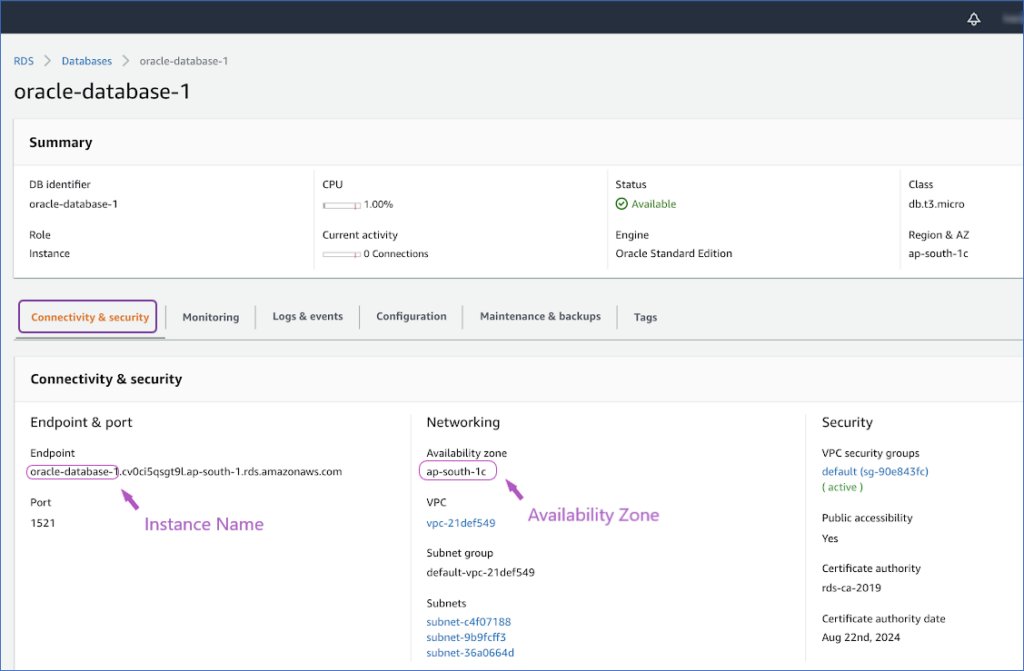
Name – display name (UI).
Instance – The instance name as shown in the above image.
Availability zone – Network’s availability zone on the RDS Database, as shown in the above image.
Access key and Security key– Details from the AimBetter user created with read permissions as explained before – for more information, check this link Creating an IAM Login. To get the access key, enter the user’s settings under IAM and refresh the access key for the updated security key also.

On the AimBetter Configurator, click Add on the Hosts tab and choose Azure SQL from the available platforms.
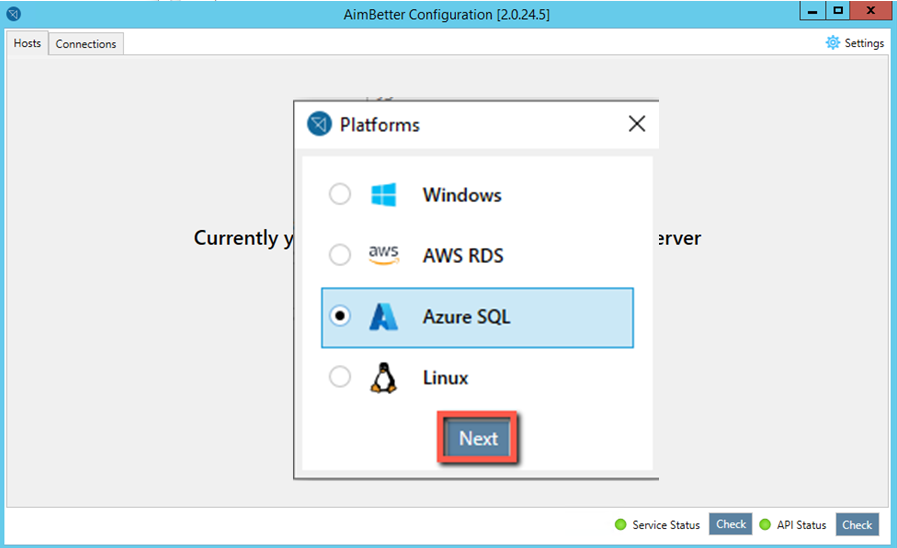
Select SQL Server Type. Choose one of the following SQL Database or SQL Managed and click Next.
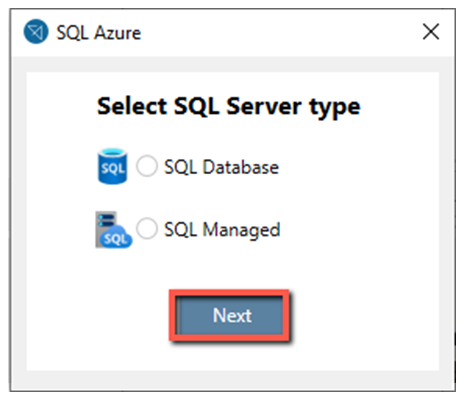
Note about the SQL Server type: Check how to identify your Azure SQL server type here.
Note about Secondary Database: If the Azure SQL Database is a Secondary one, check how to create a login with the Primary Database login SID
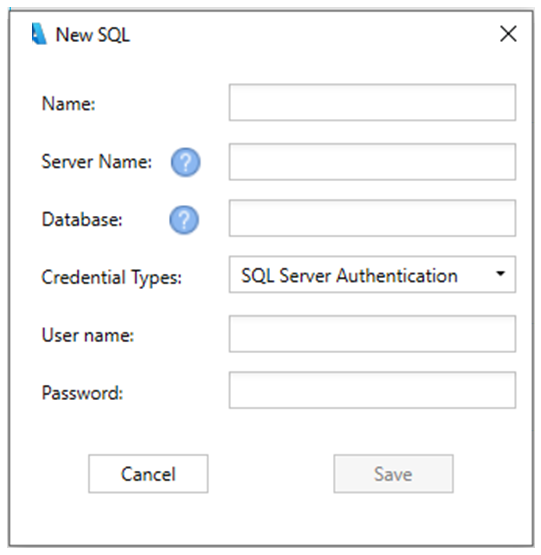
—-Azure SQL Database Instance
If Adding an Azure SQL Database Instance, fill in the following details:
Name – Name to be displayed on the UI
Server Name – Instance address: Full address + Domain + Port
Database – Database name (usually is the Instance address without Domain and Port)
User name and Password – MSSQL login and password (for creating a user with minimum requirement check Azure MSSQL Database – Create secured monitor user script)
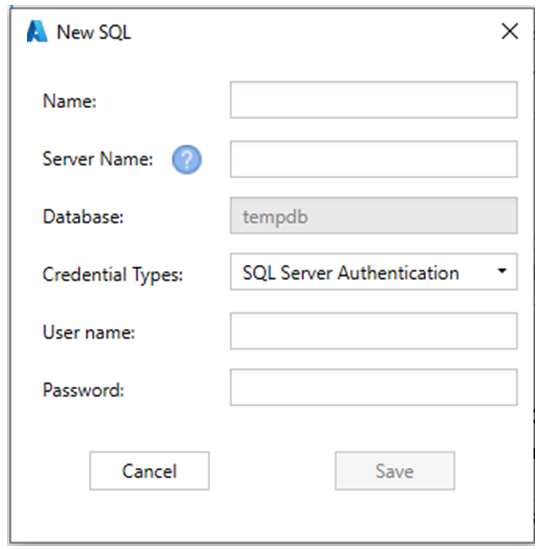
—- Azure SQL Managed Instance
If Adding an Azure SQL Managed Instance, fill in the following details:
Name – Name to be displayed on the UI
Server Name – Instance address
User name and Password – MSSQL login and password (for creating a user with minimum requirement, check MSSQL On Prime / Azure Managed – Create monitor user script)
- Windows
-
On the AimBetter Configurator, click Add on the Hosts tab and choose Windows from the available platforms.
Fill in the Server details:
-
-
- Name: General display name (what will be displayed in the UI)
- IP/Name: Server name or IP – For Local installation, you should insert a dot ( . ) in this field.
-
Notice for remote monitoring: Add the correct server name or IP and make sure that the user running the AimBetter Agent is a domain user with the necessary credentials – Administrator or Minimal Permission User.
-
- Linux
-
1- Create a Linux User for the AimBetter Agent:
-
- Enter the Linux terminal with a user that has admin-level access and run the following script.: sudo useradd -m aimbetter
- This user doesn’t need any special permissions.
- Check that the user was created with the chosen username through this script: ls -la /home/aimbetter/
- After creating the aimbetter user, select a password for the user by entering the next command: sudo passwd aimbetter
- Following this command, an empty box will be displayed with an option to insert the password. Insert your password and press enter. If the password is not accepted according to the requirements, you will receive an error message and be requested to enter a new password. If the password is accepted, you should receive a confirmation message.
- Note: The created Linux user must run any commands from his Login shell. To check if you are using the Login shell, run the following command: ” $ echo $0 ” . If the result is “-bash” or “-su”, you are on the Login shell. Be sure that it has a hyphen (-) as a prefix.
2- On the AimBetter Configurator, click Add on the Hosts tab and choose Linux from the available platforms and fill in the Linux server details:
-
- Name – display name (UI)
- IP/Name – the correct server name or IP
- User name – the created Linux user
- Password– the correct password for the created Linux user
-
- Amazon RDS
-
1- Create an IAM Login for the AimBetter Agent with read permissions only on the RDS portal:
-
- Enter the AWS Management Console with a user that has management privileges
- Go to IAM and select Users
- Click on Users -> Add user
- In Set user details, fill in the field User Name* (choose the user name – for ex: AimBetterUser)
- In Select AWS access type, select: Access type* -> Programmatic access
- Filter and select policies: AmazonDocDBReadOnlyAccess and CloudWatchReadOnlyAccess
- Click on Next and finish the Create user steps
- Make sure to copy and save the access key and security key
- For more details, check Creating an IAM Login.
2- On the AimBetter Configurator, click Add and choose AWS RDS from the available platforms and fill in the details:
You can get these details from the database panel, as shown in the image below.
Name – display name (UI).
Instance – The instance name as shown in the above image.
Availability zone – Network’s availability zone on the RDS Database, as shown in the above image.
Access key and Security key– Details from the AimBetter user created with read permissions as explained before – for more information, check this link Creating an IAM Login. To get the access key, enter the user’s settings under IAM and refresh the access key for the updated security key also.
-
- Azure
-
On the AimBetter Configurator, click Add on the Hosts tab and choose Azure SQL from the available platforms.
Select SQL Server Type. Choose one of the following SQL Database or SQL Managed and click Next.
Note about the SQL Server type: Check how to identify your Azure SQL server type here.
Note about Secondary Database: If the Azure SQL Database is a Secondary one, check how to create a login with the Primary Database login SID
—-Azure SQL Database Instance
If Adding an Azure SQL Database Instance, fill in the following details:
Name – Name to be displayed on the UI
Server Name – Instance address: Full address + Domain + Port
Database – Database name (usually is the Instance address without Domain and Port)
User name and Password – MSSQL login and password (for creating a user with minimum requirement check Azure MSSQL Database – Create secured monitor user script)
—- Azure SQL Managed Instance
If Adding an Azure SQL Managed Instance, fill in the following details:
Name – Name to be displayed on the UI
Server Name – Instance address
User name and Password – MSSQL login and password (for creating a user with minimum requirement, check MSSQL On Prime / Azure Managed – Create monitor user script)
 After configuring the server’s host (Windows, Linux or Amazon RDS), proceed to the configuration of the SQL Server instance to be monitored.
Click on Add New DB. In Database type, choose Microsoft SQL and continue.
Fill in the MSSQL instance details and click on Save:
-
-
-
Name: General display name (UI)
-
Endpoint: Choose the correct instance from the list
-
Authentication: choose Windows or SQL Server Authentication
-
-
Note about the SQL Server user credentials: Create a sysadmin MSSQL user or an MSSQL user with minimal permissions.

After configuring the server’s host (Windows, Linux, or Amazon RDS), proceed to the configuration of the Oracle Database to be monitored.
1- Create an Oracle user for AimBetter:
-
- on Windows or Linux: Script for Oracle aimbetter user on-premise
- on Amazon RDS: Script for Oracle aimbetter user on AWS RDS
2- On the AimBetter Configurator, click on Add New DB. In Database type,choose Oracle and continue.
-
-
Fill in the Oracle instance details:
-
Name: General display name (What you will see on the AimBetter UI).
-
Endpoint: Type the Oracle Hostname or Server IP.
-
Port: Enter the correct port number (default is 1521).
-
SID or Service Name: Enter the Oracle Database SID (check below how to retrieve the SID) or Service Name.
- Username: aimbetter
- Password: the aimbetter user’s password
-
-

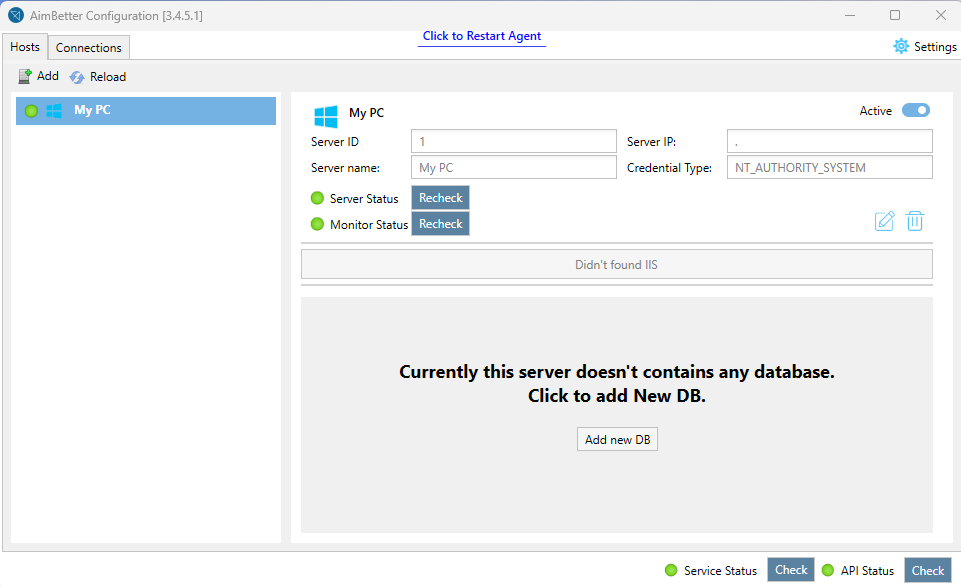
Notice for IIS configuration: The AimBetter Agent must be installed locally on the Windows web server by a user with Administrator credentials.
After configuring the server’s host (Windows), proceed to the configuration of the IIS to be monitored.
On the AimBetter Configurator, click on Add IIS:

This step will configure the WEB monitoring.
If there is no IIS program running on the server, you will see the following message:
“Didn’t find IIS”
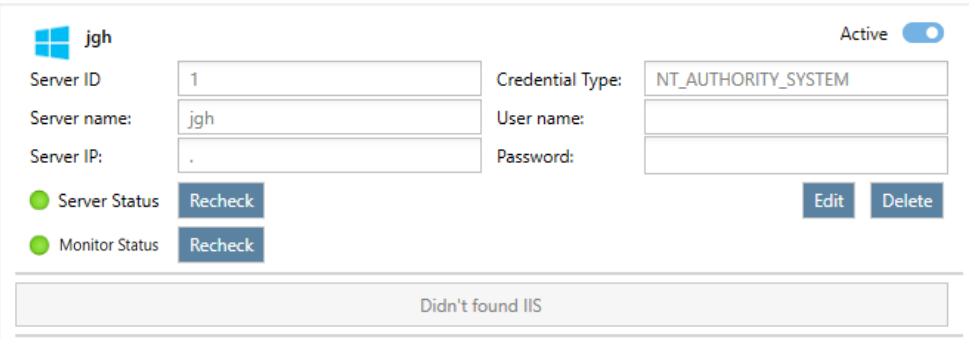
After the IIS configuration, the IIS Status light should be green, and you should start seeing data on AimBetter’s Web module.
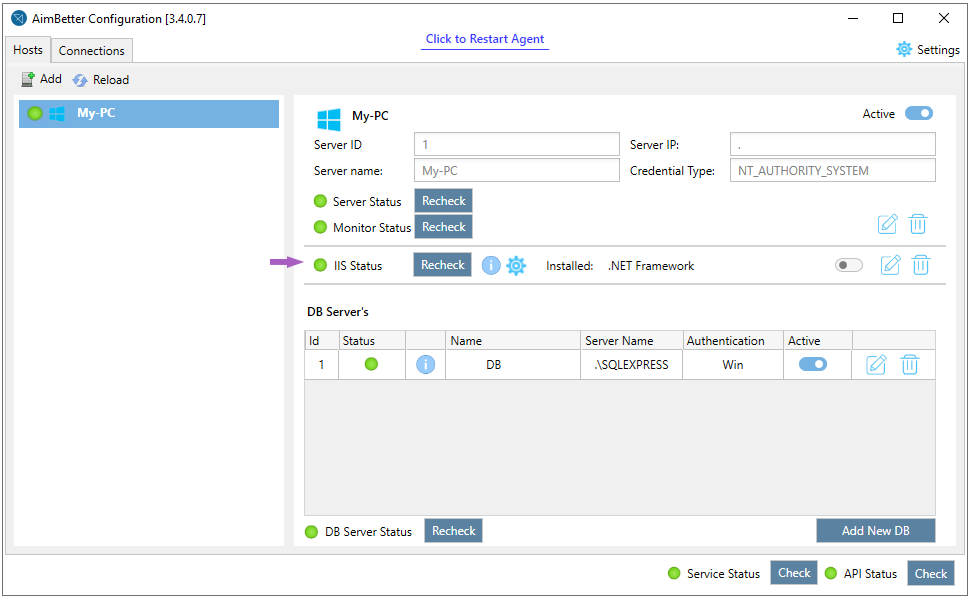
If the IIS Status is red light, click on the info icon beside the Recheck button and check our installation troubleshooting – IIS Status is red.
- Microsoft SQL Server
-
After configuring the server’s host (Windows, Linux or Amazon RDS), proceed to the configuration of the SQL Server instance to be monitored.
Click on Add New DB. In Database type, choose Microsoft SQL and continue.
Fill in the MSSQL instance details and click on Save:
-
-
-
Name: General display name (UI)
-
Endpoint: Choose the correct instance from the list
-
Authentication: choose Windows or SQL Server Authentication
-
-
Note about the SQL Server user credentials: Create a sysadmin MSSQL user or an MSSQL user with minimal permissions.
-
- Oracle Database
-
After configuring the server’s host (Windows, Linux, or Amazon RDS), proceed to the configuration of the Oracle Database to be monitored.
1- Create an Oracle user for AimBetter:
-
- on Windows or Linux: Script for Oracle aimbetter user on-premise
- on Amazon RDS: Script for Oracle aimbetter user on AWS RDS
2- On the AimBetter Configurator, click on Add New DB. In Database type,choose Oracle and continue.
-
-
Fill in the Oracle instance details:
-
Name: General display name (What you will see on the AimBetter UI).
-
Endpoint: Type the Oracle Hostname or Server IP.
-
Port: Enter the correct port number (default is 1521).
-
SID or Service Name: Enter the Oracle Database SID (check below how to retrieve the SID) or Service Name.
- Username: aimbetter
- Password: the aimbetter user’s password
-
-
-
- Microsoft IIS
-
Notice for IIS configuration: The AimBetter Agent must be installed locally on the Windows web server by a user with Administrator credentials.
After configuring the server’s host (Windows), proceed to the configuration of the IIS to be monitored.
On the AimBetter Configurator, click on Add IIS:
This step will configure the WEB monitoring.
If there is no IIS program running on the server, you will see the following message:
“Didn’t find IIS”
After the IIS configuration, the IIS Status light should be green, and you should start seeing data on AimBetter’s Web module.
If the IIS Status is red light, click on the info icon beside the Recheck button and check our installation troubleshooting – IIS Status is red.